Press Hardened Steel Testing
Why is Press Hardened Steel Important?
Press-hardened steel, also known as hot stamping, is being hailed as a newer structural innovation in the automotive industry with a multipurpose goal of making vehicles lighter while also increasing safety. This goal is accomplished by increasing the strength of lighter gauge steel thereby reducing the mass of the body structural components while stiffening or strengthening these components.
What are the Benefits of Press Hardened Steel?
This manufacturing process is a technological “jump” over hurdles as significant mass in the automotive body is reduced, ultimately allowing for better mileage and energy savings, which we all know has been a key driving factor in energy mandates throughout the 2010 decade. Also by strengthening these materials to high strength standards, even the smallest vehicles are earning NIHTSA 5 star crash ratings, with more robust testing criteria, which has been unheard of in past years.
In addition to the above mentioned benefits, the press hardened steel parts will enable greater formability, and more complex shaping, therefore reducing part numbers and amount of welds involved in manufacturing. The technology is relatively new to the automotive industry, however components are being converted to press-hardened steel from normal die stamping at ever increasing rates. Of course, this is not a simple tool change but requires completely new die technology and heat treating capability at the die which requires intense capital. Sponsored mostly by the automotive OEMs, production capacity for press-hardened steel parts is skyrocketing as well.
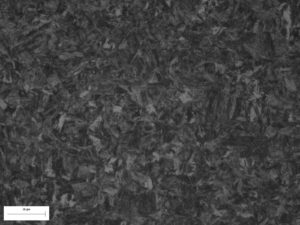
With new manufacturing technology being deployed, new materials or raw material refinements needed to be made to accommodate the requirements of the new technology. The particular grade of steel that is universally accepted as meeting all of the forming and target property requirements is a boron alloy steel known by grade 22MnB5. Coming in as a blank, typical tensile strength for this ferrite-pearlite microstructure sheet is on the order of 600MPa; when leaving the press it will be fully martensitic structure with a tensile strength on the order of 1600MPa. There is also typically an aluminum-silicon coating requirement that must be robust enough to survive the hot stamping process intact.
Although the steel companies have kept this application process proprietary, there does appear to be at least some level of initial annealing.
This coating is typically specified on automotive parts to mediate the need to descale the part after heat treatment and also provide some level of corrosion protection to eliminate the need to apply rust preventatives after stamping. Both of these needs provide significant cost and time savings in the manufacturing process.

What is the Press Hardening Steel Process?
The direct method of Press-Hardening steel is very well documented. The simplified version of the process is as follows:
- The blank or pre-cut blank comprised of ferritic-pearlitic matrix is austenitized in an oven at above 900 deg C.
- The blank is removed from the oven and transferred to a stamping/forming die set immediately (like within 10 seconds of removal from the oven)
- The die is closed and the part formed
- The die is then quenched at a rapid rate through internal coolant channels. Rapid heat transfer in the die is critical to ensure that the material properties are met uniformly throughout the part
- The die is then opened and the part removed
Due to the time/temperature critical portion of the process, robotics are typically used for all material transfer. Thermal and heat transfer studies are often the required at the die prior to validation before any parts are even evaluated destructively.

Why is Laboratory Testing for Press Hardened Steel (PHS) Necessary?
Caution for rapid deployment of such game changing technology has been undertaken by the automotive OEMs, such that standards have been developed to examine the material properties of the output component at both the prototype and production level.
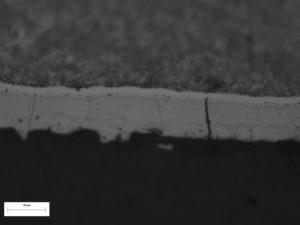
Domestically both General Motors and Ford have guidelines for where and how to sample the part to assess for properties such as gauge thinning, ultimate tensile strength, yield strength, percent elongation, core hardness, bend properties and final microstructure verification. In addition, the properties of the aluminum silicon (AlSi) coating are also inspected for total coating thickness, diffusion layer thickness, and surface roughness. For General Motors the inspection standard is GMW14400.
How Can RTI Laboratories Help You?
At RTI Laboratories, we have worked with most of the automotive OEMs to develop and refine the inspection methodologies to adequately assess the properties required by the inspection of the final parts. We routinely assess the following properties of the finished part and report to the guidelines of the particular automotive OEM end customer:
- Gage thinning by dimensional inspection
- Ultimate tensile strength
- Yield strength
- Elongation %
- Rockwell Hardness (HRC)
- Bend properties
- Surface roughness by stylus profilometry
- Total coating thickness by cross-section optical microscopy
- Diffusion layer thickness by cross-section optical microscopy or Scanning Electron Microscopy (SEM)
- Metallographic inspection for microstructure

